Deviled Eggs: A Timeless Favorite with a Delicious Twist
Deviled Eggs
Deviled eggs have long been a favorite appetizer, gracing tables at family gatherings, holiday feasts, and casual parties alike. Their irresistible combination of creamy yolks, tangy seasonings, and crisp whites make them an unassuming yet delightful bite. The contrast of textures—from the smooth, velvety filling to the crunchy exterior—is what makes deviled eggs such a classic. Whether you’re serving them at a holiday dinner or as a simple snack, these little treats never fail to satisfy. They’re versatile, easy to make, and, best of all, they can be dressed up or down to suit any occasion.
In this blog post, we’ll explore how to create the perfect deviled eggs—explaining the ingredients, step-by-step instructions, helpful tips, and even some nutritional information to help you get the most out of this classic dish. Along the way, we’ll also discuss how deviled eggs pair beautifully with a variety of main dishes, particularly ham, and offer suggestions for making these eggs even more special.
Why Deviled Eggs Are a Favorite
There’s something undeniably comforting about deviled eggs. Perhaps it’s the simplicity of the ingredients, or the fact that they’re a crowd-pleaser at any event. Whether it’s for a Christmas Dinner, a Thanksgiving Feast, or a quick side to serve with ham, deviled eggs are the perfect combination of indulgence and elegance.
What makes deviled eggs so popular is their versatility. You can keep them simple with just a few ingredients or add flair with a variety of toppings and seasonings. Plus, they’re incredibly easy to prepare, making them the ideal dish to serve when you’re short on time but want something that looks and tastes impressive. The balance of flavors—creamy yolk, tangy mustard, and a touch of paprika for garnish—combined with the satisfying crunch of the egg white makes for a snack that’s both simple and luxurious.
But let’s not forget about their texture! The egg whites provide that perfect crispy bite, while the creamy filling adds a velvety richness. When made properly, deviled eggs strike the ideal balance between savory and creamy, making them the ideal appetizer or side dish to complement any meal.
Ingredients for the Perfect Deviled Eggs
To get started, here’s what you’ll need to make the classic deviled eggs. This recipe is simple yet delicious, and you can easily adjust it to suit your preferences.
Ingredients:
- 6 large eggs
- 1/4 cup mayonnaise
- 1 tablespoon Dijon mustard
- 1 teaspoon white vinegar
- 1/4 teaspoon salt
- 1/4 teaspoon black pepper
- 1 tablespoon relish (optional for added sweetness)
- Paprika (for garnish)
This recipe makes 12 deviled eggs (or 6 servings), and you can easily double or halve the recipe as needed. These ingredients create a classic version, but don’t be afraid to get creative with your variations! Add herbs like dill or chives for an extra burst of flavor, or mix in some crumbled bacon for a smoky twist.
Step-by-Step Instructions for Perfect Deviled Eggs
Making deviled eggs is surprisingly easy! Here’s a step-by-step guide to ensure you end up with the perfect creamy filling and crispy whites.
Step 1: Boil the Eggs
The first step to making deviled eggs is boiling the eggs. Place the eggs in a saucepan and cover them with cold water by about an inch. Turn the heat to medium-high and bring the water to a boil. Once the water is boiling, cover the pan with a lid and turn off the heat. Let the eggs sit in the hot water for about 10-12 minutes. This will ensure the eggs are hard-boiled but not overcooked.
Once the eggs are ready, transfer them to a bowl of ice water to cool for at least 5 minutes. This will stop the cooking process and make peeling them easier.
Step 2: Peel and Halve the Eggs
Once the eggs are cool, gently tap them on a hard surface to crack the shell. Carefully peel the shell off, trying to keep the whites intact. After peeling, slice the eggs in half lengthwise, and carefully remove the yolks.
Place the yolks in a separate bowl and set the egg whites aside on a platter. Be sure to check the whites for any imperfections so you can discard any that might not be usable.
Step 3: Make the Filling
Mash the egg yolks with a fork until they are smooth. Add the mayonnaise, Dijon mustard, white vinegar, salt, and pepper to the mashed yolks. Stir until the mixture is creamy and fully combined. If you like a little sweetness in your deviled eggs, stir in a tablespoon of relish or finely chopped pickles at this stage.
Step 4: Fill the Egg Whites
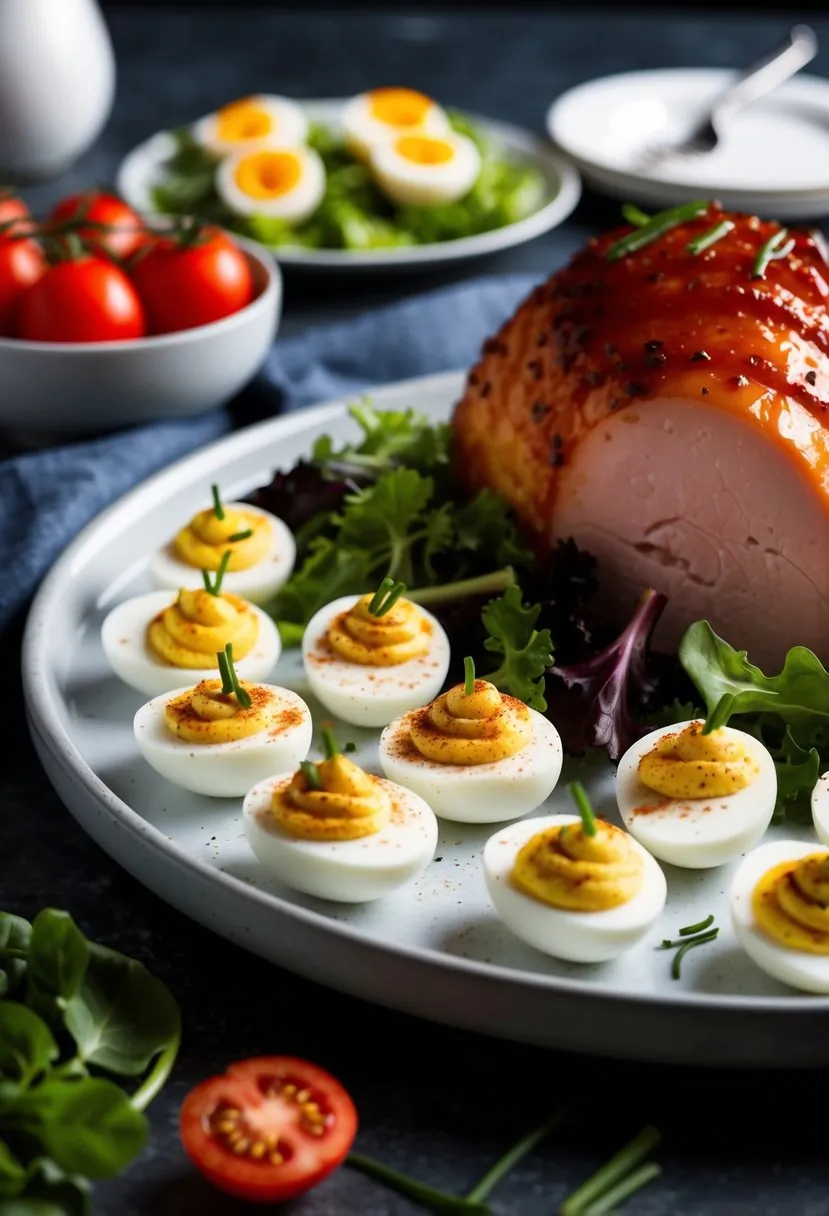
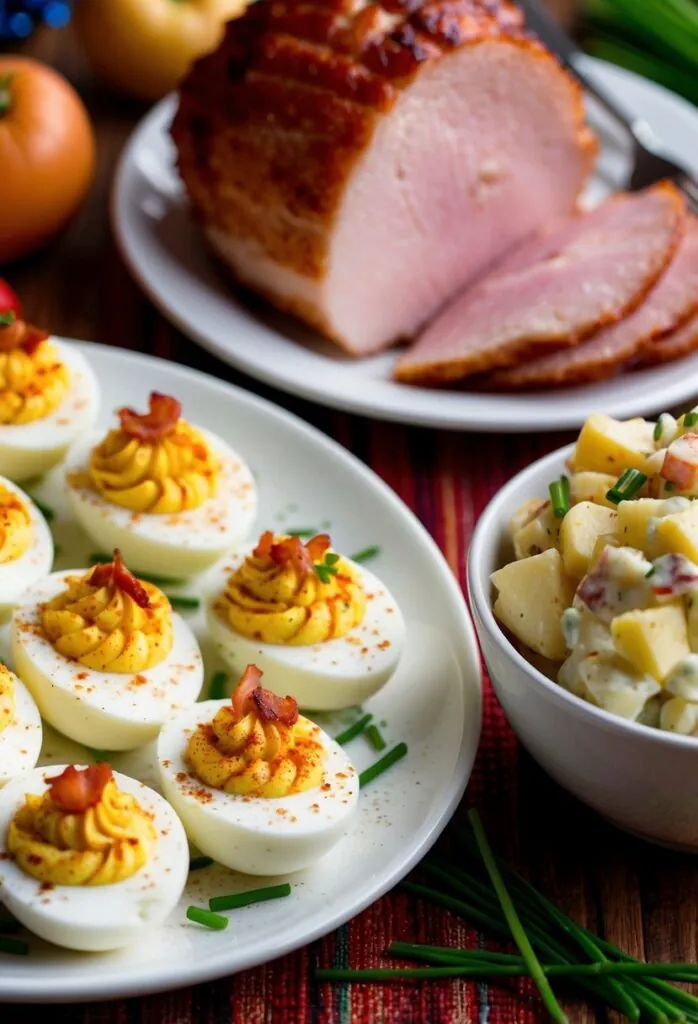
Spoon the creamy yolk mixture into the egg whites. For a more polished look, you can use a piping bag to pipe the mixture into the egg halves. This will give your deviled eggs a neat, professional look. Once all the eggs are filled, garnish with a sprinkle of paprika for added color and flavor.
Step 5: Serve and Enjoy
Place the deviled eggs on a serving platter and refrigerate them for at least 30 minutes before serving to let the flavors meld. They are best served chilled. Deviled eggs are the perfect addition to any party, gathering, or holiday meal.
Helpful Tips for the Best Deviled Eggs
- Boiling Eggs: Overcooked eggs can result in a greenish-gray ring around the yolk and a dry filling. To avoid this, make sure you remove the eggs from the hot water at the right time and cool them quickly in an ice bath.
- Texture Matters: For an extra creamy filling, use a hand mixer to beat the yolk mixture. This will give the filling an incredibly smooth and velvety texture.
- Customization: Don’t hesitate to customize your deviled eggs. Add crumbled bacon, fresh herbs, or a touch of hot sauce to the filling for a more personalized twist.
- Frying for Extra Crunch: If you love crispy textures, consider lightly frying the egg whites. Heat oil to 350°F (175°C) and fry the whites until they’re golden and crispy. Let them drain on paper towels before filling.
- Storage: If you need to make deviled eggs ahead of time, they can be stored in an airtight container in the refrigerator for up to two days.
Nutritional Information (per serving):
- Calories: 60
- Protein: 5g
- Fat: 4g
- Carbohydrates: 1g
- Cholesterol: 120mg
Deviled eggs are not only delicious but also relatively light in calories, making them a great option if you’re looking to add some flavor without the guilt. They’re high in protein and can be part of a balanced diet when eaten in moderation.
Serving Suggestions: What Goes With Ham?
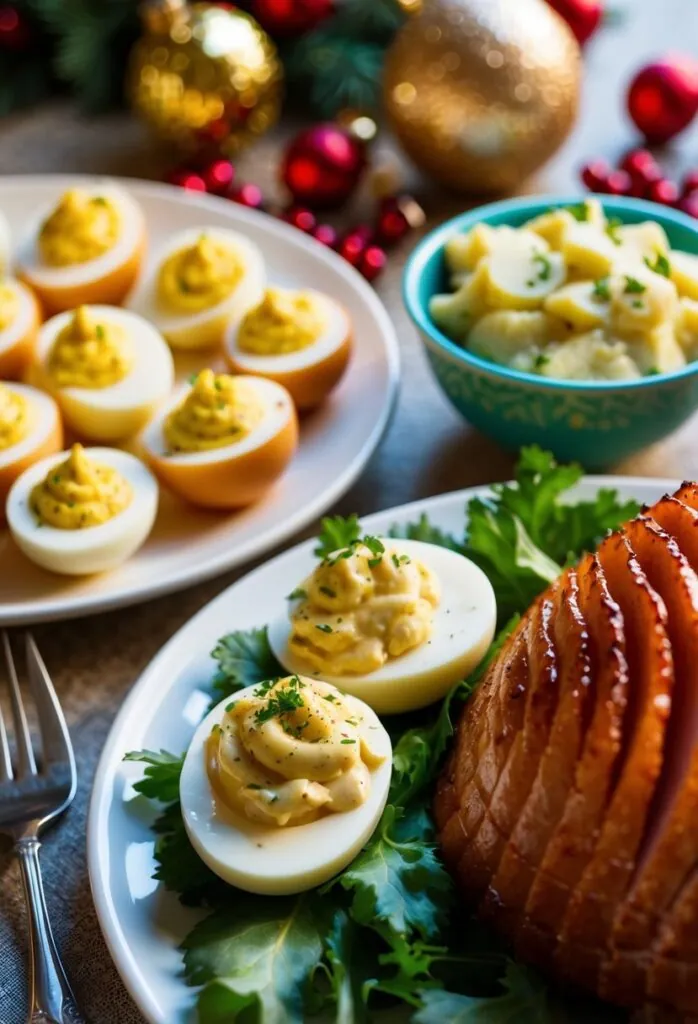
Deviled eggs pair wonderfully with a variety of dishes, but they especially complement ham dishes. Whether it’s a glazed ham for a festive holiday meal or a simple ham steak for a family dinner, deviled eggs make the perfect side.
Here are some suggestions for what to serve with deviled eggs:
- Ham Recipes for Dinner: Serve deviled eggs as a side to your favorite ham dishes. They’re perfect for Easter, Thanksgiving, or any holiday meal. Whether you’re serving a simple honey-glazed ham or a more intricate spiral-cut ham, deviled eggs provide the ideal creamy and tangy contrast.
- What to Make With Ham: Deviled eggs are an excellent way to use leftover ham. You can chop it up and mix it into your deviled egg filling for an even heartier appetizer.
- Sides for Ham Dinner Christmas: Deviled eggs are a classic side dish for Christmas dinner. Pair them with roasted vegetables, mashed potatoes, and your favorite ham recipe for a festive and satisfying meal.
- Cheap Dinners for a Family: Deviled eggs are an affordable way to make a meal feel special. They’re inexpensive to prepare and can be paired with other budget-friendly dishes like baked beans, cornbread, or macaroni salad.
- What to Serve with Ham: Along with deviled eggs, consider adding some sautéed greens, roasted potatoes, or corn on the cob. These dishes will complement the richness of the ham and the creaminess of the deviled eggs perfectly.

Conclusion: Deviled Eggs for Every Occasion
Deviled eggs are a versatile, flavorful, and beloved dish that never fails to impress. Whether you’re serving them at a holiday gathering, alongside a hearty ham dinner, or simply as a snack for your family, deviled eggs offer a combination of savory, creamy, and crispy textures that everyone loves.
From Thanksgiving Deviled Eggs to Sweet Deviled Eggs and even Gourmet Deviled Eggs, there are endless ways to customize this classic dish. And with the right ingredients, simple instructions, and a few helpful tips, you can make deviled eggs that will have everyone asking for the recipe.
So next time you’re preparing a ham dish for dinner, don’t forget to make a batch of deviled eggs! They’ll be the perfect addition to your meal. And, as always, feel free to share your favorite deviled egg variations in the comments below! Let’s get creative and make this timeless appetizer your own.


 Not only is this dish packed with flavor, it also requires minimal ingredients. With just chicken, garlic parmesan sauce, cream cheese, and a few seasonings, anyone can create a comforting meal without stress. It's perfect for weeknight dinners or when entertaining guests. As the chicken cooks, it absorbs the savory flavors, resulting in a dish that is both creamy and full of taste. Exploring different side options can enhance the meal even further, making it suitable for a variety of occasions. With the right preparation, this dish can easily become a family favorite. ## Why This Recipe  This 4-Ingredient Crockpot Garlic Parm Chicken is an excellent choice for busy families. It combines simplicity and flavor, making it an appealing meal option. **Key Benefits:** * **Easy to Prepare:** With only four main ingredients, this recipe saves time in meal planning and cooking. * **One-Pot Cooking:** Using a crockpot means less cleanup. It all cooks in one pot. **Flavorful Dish:**\ The garlic and Parmesan blend creates a rich flavor. This attracts both kids and adults. * **Versatile Pairing:**\ It works well with pasta, rice, or vegetables. Families can customize it based on preferences. **Nutritional Balance:**\ Chicken is a great source of protein. Adding vegetables like broccoli can increase vitamins and minerals. * **Budget-Friendly:**\ Four ingredients are often affordable, making it a wallet-friendly option for families. In summary, the 4-Ingredient Crockpot Garlic Parm Chicken offers convenience, flavor, and versatility. Its straightforward approach makes it ideal for weeknight dinners. ## 4-Ingredient Crockpot Garlic Parm Chicken Recipe  This easy recipe highlights the simplicity of making a delicious chicken dish in the crockpot using just four key ingredients. The process is straightforward, making it perfect for busy weeknights or family dinners. ### Ingredients List To prepare the 4-Ingredient Crockpot Garlic Parm Chicken, the following ingredients are needed: * **1 pound boneless chicken breasts**\ This is the main ingredient, providing protein and a base for the dish. * **1 cup garlic Parmesan sauce**\ This sauce gives the chicken its rich flavor and creaminess. * **1 cup cream cheese**\ Cream cheese adds a smooth texture and enhances the overall taste. * **1/2 cup grated Parmesan cheese**\ Adding grated Parmesan provides extra cheesiness and a nice finish. This simple list makes it easy to shop and prepare. With just these four ingredients, anyone can create a tasty meal. ### Step-by-Step Instructions 1. **Prepare the Chicken**: Start by placing the boneless chicken breasts in the bottom of the crockpot. 2. **Add the Sauce**: Pour the garlic Parmesan sauce over the chicken, ensuring it is evenly covered. 3. **Include the Cream Cheese**: Cut the cream cheese into chunks and add it on top of the sauce. This helps it melt evenly during cooking. 4. **Cook the Mixture**: Close the lid of the crockpot and set it on low for 4-6 hours or until the chicken is thoroughly cooked and tender. 5. **Shred the Chicken**: Once cooked, shred the chicken directly in the pot using two forks. Mix it gently with the sauce. 6. **Serve and Enjoy**: Finally, sprinkle grated Parmesan cheese on top before serving for added flavor. These steps ensure a hassle-free cooking experience that results in a delicious meal. ### Cooking Time and Temperature For the 4-Ingredient Crockpot Garlic Parm Chicken, the recommended cooking time is between **4 to 6 hours on low heat**. Cooking on low allows the chicken to remain moist and tender. It also gives the flavors time to blend together. If you prefer to cook on high, adjust the time to about **2 to 3 hours**. It's essential to check that the internal temperature of the chicken reaches **165°F** for safe consumption. This simple guideline ensures that the chicken is both safe to eat and perfectly cooked. ## Tips for Perfect Crockpot Chicken  Creating delicious crockpot chicken requires certain techniques. The right chicken cuts, flavor options, and avoiding common mistakes will enhance the meal. ### Choosing the Best Chicken Cuts For crockpot recipes, boneless, skinless chicken thighs are an excellent choice. They remain juicy and tender during the long cooking process. Chicken breasts can also work, but they may dry out if overcooked. **Recommended Cuts:** * **Chicken Thighs:** Tender and flavorful. * **Chicken Breasts:** Leaner, but watch cooking time. * **Whole Chicken:** Imparts richer flavor but needs careful cooking. Avoid using cuts with bones or skin, as they may not cook evenly and can affect sauce consistency. ### Flavor Enhancements and Variations Enhancing crockpot chicken flavor is easy with just a few ingredients. Seasoning the chicken with salt, pepper, garlic powder, and Italian herbs offers a classic taste. **Flavor Additions:** * **Cheese:** Grated Parmesan adds a rich taste. * **Vegetables:** Onions and peppers can add depth. * **Broth:** Use chicken or vegetable broth for moisture. Experimenting with sauces such as barbecue, teriyaki, or creamy dressings can also elevate the dish. Each variation provides a unique twist while maintaining the essence of garlic parmesan flavors. ### Avoiding Common Crockpot Mistakes Several common mistakes can ruin crockpot meals. Cooking with too much liquid can lead to a soupy consistency. **Key Mistakes to Avoid:** 1. **Overfilling:** Stick to the recommended quantity in recipes. 2. **Inaccurate Cooking Time:** Adjust times based on the cut and size of chicken. 3. **Skipping Browning:** Slightly browning chicken beforehand can enhance flavor. Monitoring these factors will help achieve the best results in crockpot chicken dishes. This attention to detail enhances both texture and taste. ## Serving Suggestions and Pairings This section focuses on enhancing the dining experience with the 4-Ingredient Crockpot Garlic Parm Chicken. The right side dishes and presentation tips can elevate the meal from simple to deliciously inviting. ### Side Dishes That Complement Garlic Parm Chicken Choosing the right sides can make a big difference. Here are some excellent options: * **Roasted Vegetables**: Roasted broccoli, carrots, or Brussels sprouts provide a nice contrast to the richness of the chicken. Toss them in olive oil and garlic for added flavor. * **Pasta or Rice**: Creamy pasta or fluffy rice can soak up the garlic Parmesan sauce. A simple buttered pasta or a side of risotto works well. * **Salad**: A fresh green salad with a light vinaigrette cuts through the meal's richness. Ingredients like spinach, arugula, and cherry tomatoes offer a refreshing touch. * **Garlic Bread**: For those who love garlic, a side of garlic bread complements the dish perfectly. It also provides a crunchy texture. Each of these options balances the flavors and enhances the dining experience. ### Presentation Tips Presentation plays a vital role in making a meal appealing. Here are some useful tips: * **Use Color**: Garnish the chicken with fresh parsley or basil. This adds a pop of color to the dish. * **Layering**: Serve the chicken on a platter with the side dishes arranged thoughtfully around it. This creates an inviting display. * **Serve in Individual Portions**: For a more upscale feel, plate the chicken and sides in individual bowls. This adds a touch of elegance. * **Quality Dishware**: Using nice plates or bowls can elevate the whole dining experience. Simple white dishes highlight the food well. These tips will make the meal visually appealing and more enjoyable for everyone at the table. ## Storing and Reheating Leftovers Properly storing and reheating leftovers is essential for maintaining flavor and quality. Following the right steps can help keep the dish fresh and enjoyable for future meals. ### Best Storage Practices To store leftovers safely, first, let the dish cool to room temperature. This prevents condensation, which can lead to spoilage. Place the chicken and pasta in an **airtight container**. Labels with the date can help track freshness. It is best to consume leftovers within **3 to 4 days**. If longer storage is needed, they can be frozen. Make sure to use **freezer-safe containers** or bags. Label them with the date for easy reference. Thaw in the refrigerator overnight before reheating to preserve texture and flavor. ### How to Reheat Without Drying Out When reheating the leftovers, a few methods work best to avoid dryness. The oven is a great option. Preheat it to **350°F (175°C)**. Place the pasta in a baking dish and add a splash of broth or sauce. Cover with foil to keep moisture in and heat for about **15-20 minutes**. Microwaving is more convenient and quick. Use a microwave-safe bowl. Add a little liquid, cover with a lid or microwave-safe wrap, leaving a vent. Heat in short bursts, stirring in between, until warmed through. Following these steps will ensure the dish tastes good and maintains its quality.](https://noshdinnerrecipes.com/wp-content/webp-express/webp-images/uploads/2025/04/image-2-768x1127.jpeg.webp)